
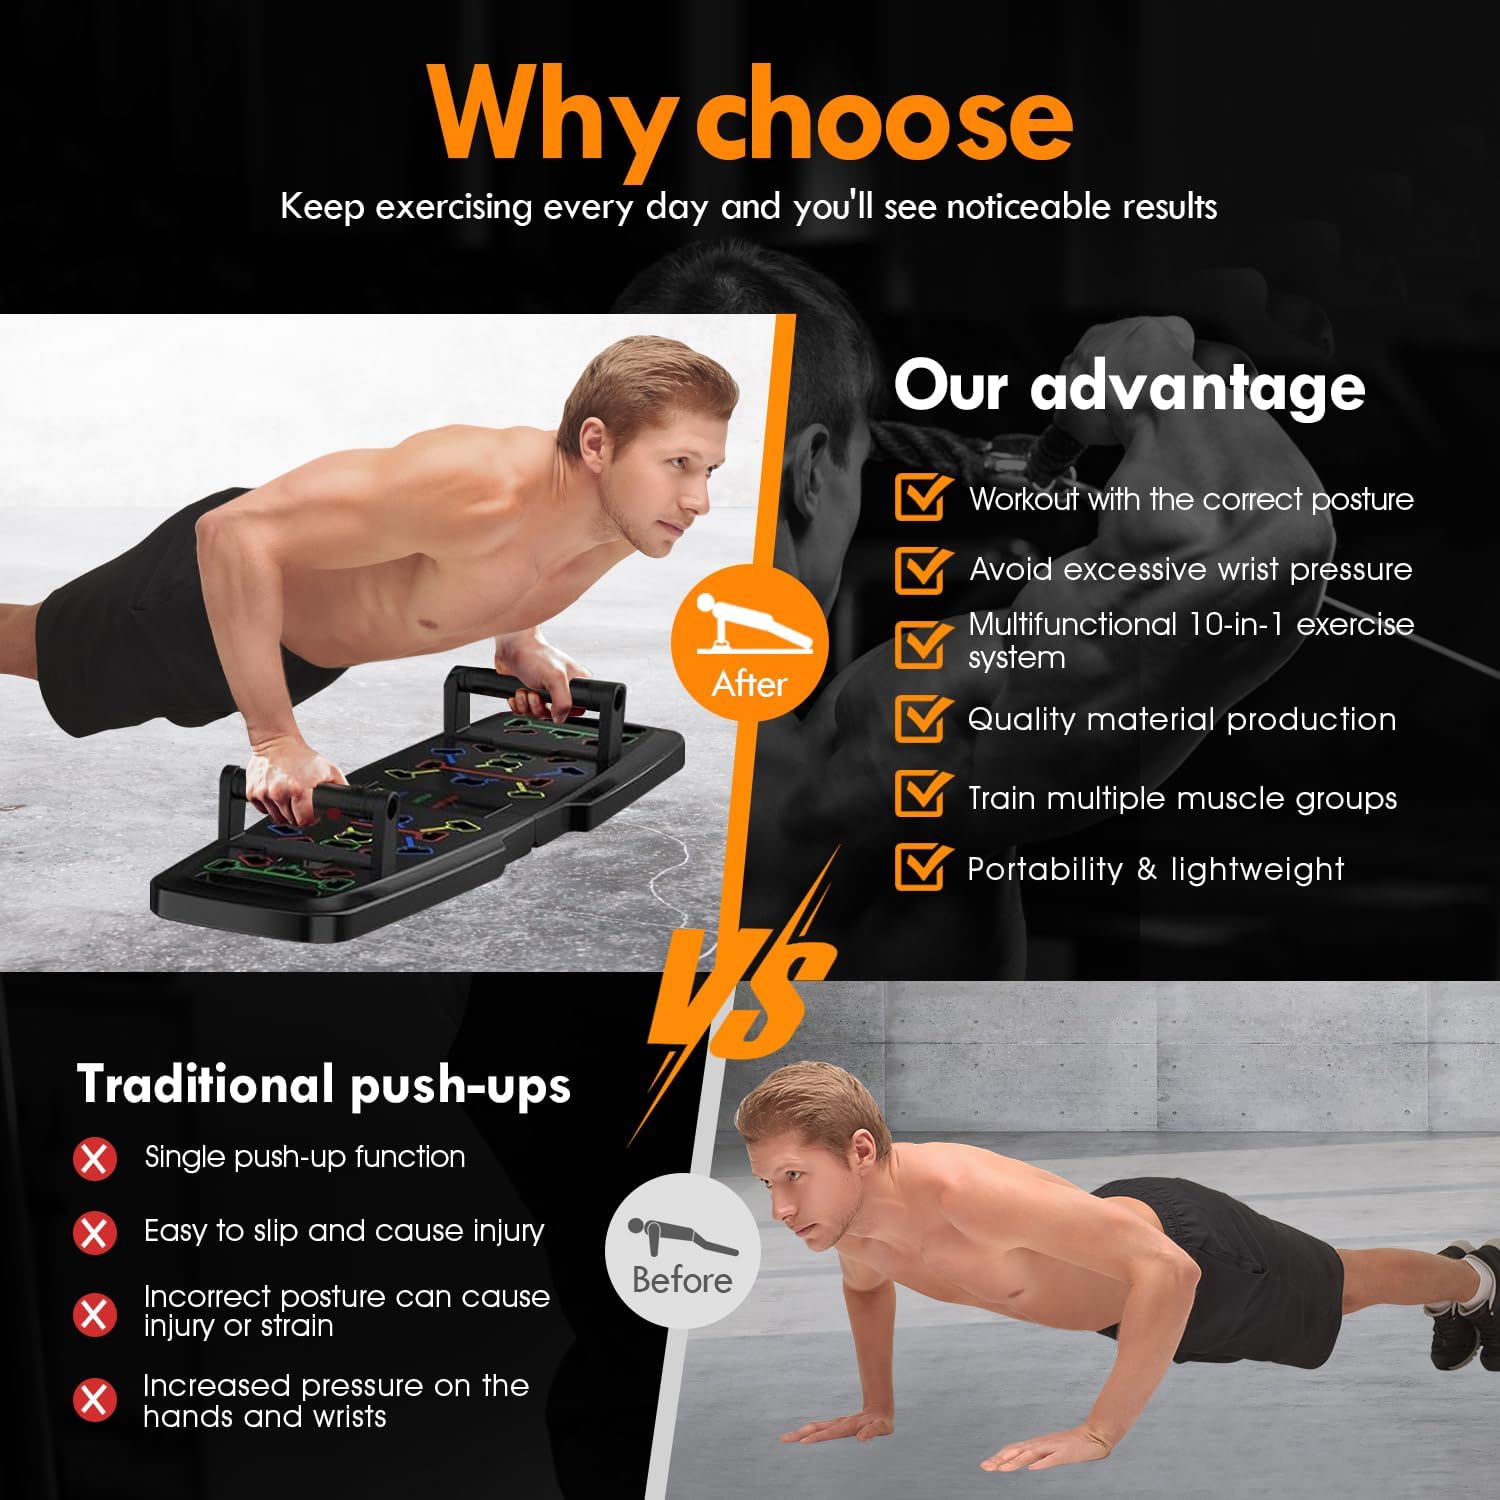
Many fitness enthusiasts struggle to target specific muscles during push-ups—hands too wide overemphasize chest while narrow placements overload triceps. Without precise hand positioning and stable wrist angles, push-ups often become painful or ineffective, leading beginners to skip them or veterans to plateau. Furthermore, limited space and bulky conventional push-up stands prevent some from developing proper form—hindering strength gains, shoulder stability, and core activation.
In this article, you’ll learn how the Push Up Board Home Gym solves these challenges by offering a portable platform featuring multiple color-coded slots—each mapping to optimal muscle engagement (chest, shoulders, back, triceps). You’ll explore the board’s durable ABS plastic construction, non-slip base, and easy assembly—plus step-by-step instructions for 12 push-up variations. By tailoring hand placement precisely, you’ll sculpt balanced upper-body strength without guesswork—transforming a simple floor exercise into a science-driven routine.
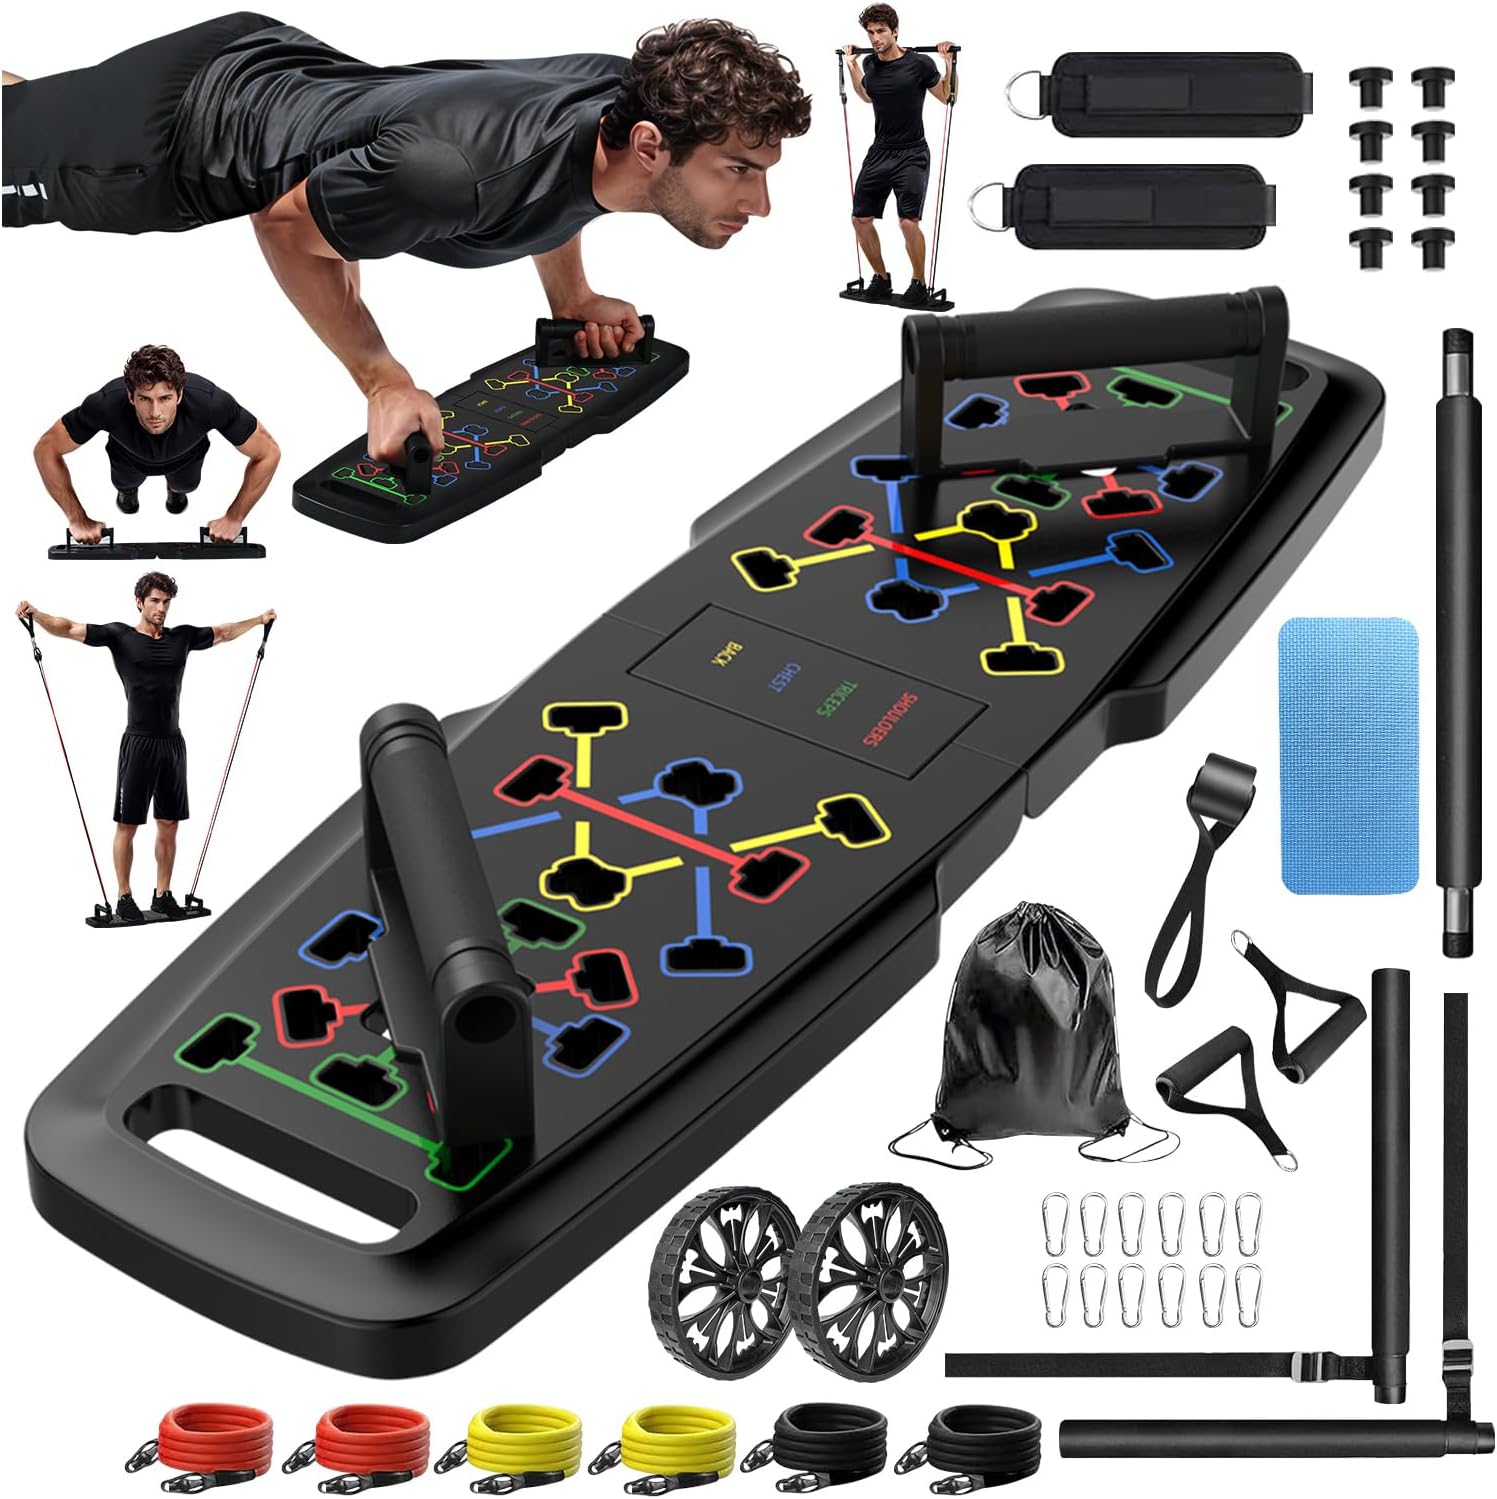
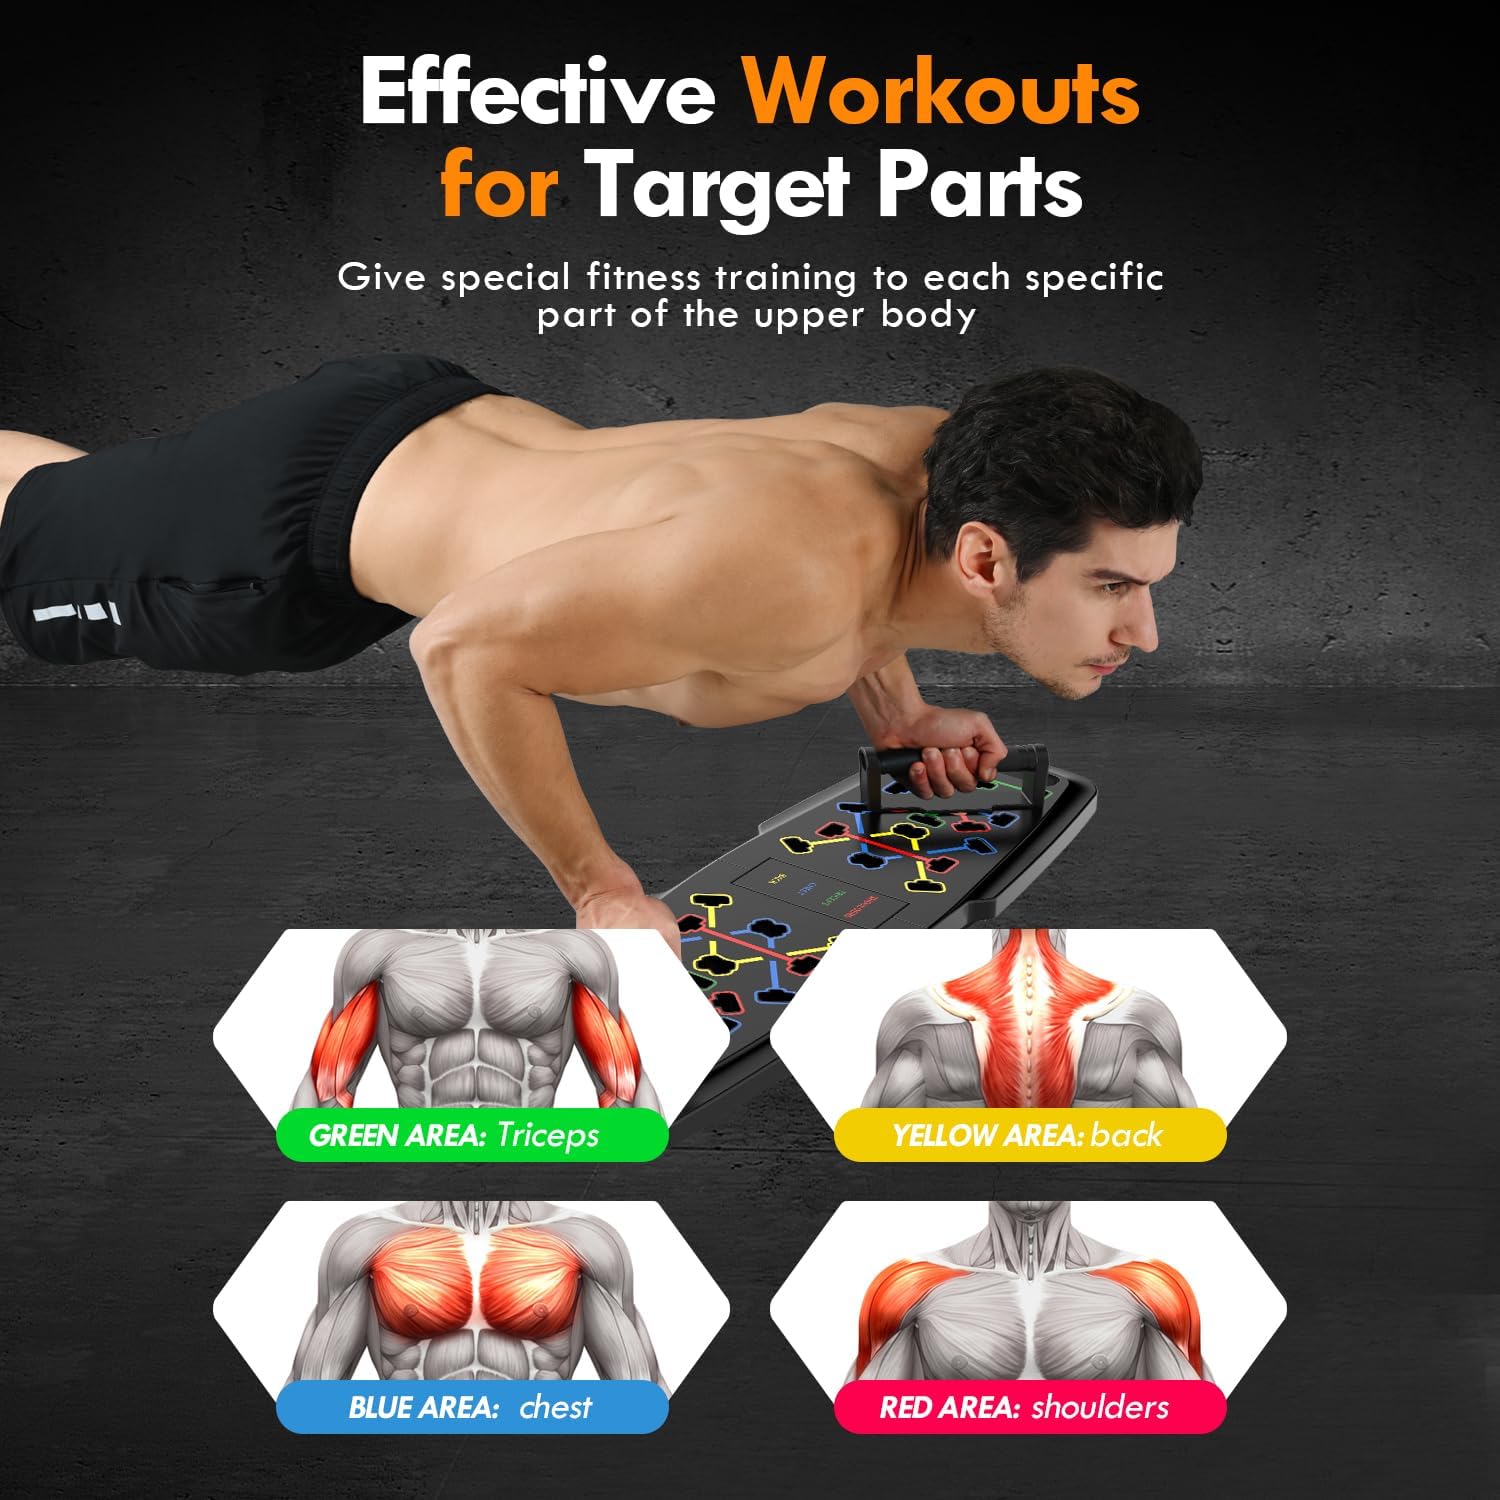
Color-Coded Design for Targeted Muscle Activation
Unlike generic push-up bars or relying on just floor placement, the Push Up Board uses a standardized color system to guide hand placement:
- Red Slots (Chest): Positioned widest on the board—emphasizes pectoral fibers while maintaining shoulder joint safety. Users slide handles into red slots for stability, ensuring proper elbow flare and maximizing chest engagement.
- Blue Slots (Triceps): Narrower slots near center—forces elbows close to body during descent, targeting triceps and anterior deltoids. This placement recruits serratus anterior and fosters elbow health by avoiding excessive flaring.
- Green Slots (Shoulders): Mid-width slots engage anterior (front) and medial (side) deltoids. This arrangement focuses on shoulder stability and hypertrophy, perfect for building well-rounded overhead pressing strength.
- Yellow Slots (Back/Core): Handles placed in these slots trigger more scapular retraction and core stability, recruiting latissimus dorsi, rhomboids, and obliques. Ideal for athletes aiming to enhance scapular control and spinal alignment.
By simply inserting the included ergonomic push-up handles—complete with foam grips—into the corresponding color-coded positions, users receive instant feedback on hand angles and muscle focus areas. Each plastic handle posts into injection-molded ABS plastic guides that lock in place with friction—ensuring no wobble during dynamic reps.
Durable Construction and Portable Convenience
Designed for frequent use, the Push Up Board Home Gym features:
- High-Density ABS Plastic Board: Measuring 20″ × 12″, the board supports up to 440 lbs. Its reinforced thickness prevents bowing even under heavy users. You can safely perform explosive plyometric push-ups without fear of cracking.
- Non-Slip Rubber Feet: Four strategically placed rubber pads prevent the board from moving on hardwood, laminate, tile, or low-pile carpet. Even during one-arm variations or wide-angle declines, the board remains planted.
- Ergonomic Foam-Grip Handles: Each handle measures 10″ long with soft, sweat-wicking foam grips. The slight elevation off the floor (approximately 2″) reduces wrist extension compared to flat-ground push-ups—decreasing joint strain.
- Foldable Design for Travel: The handles disassemble, and the board weighs just 3 lbs—making it easy to store under a bed or slip into a backpack. Perfect for traveling professionals or frequent movers who need consistent exercise equipment.
Because the board doesn’t require electricity or bulky attachments, it slots into any home gym setup. Lay it on the floor beside a mat or set it on grass for outdoor sessions—no additional footprint required.
Essential Push-Up Variations You Can Perform
By changing handle positions on the board, you unlock a library of twelve core push-up variations. Here are four foundational movements:
- Standard Chest-Focused Push-Up (Red Slots):
- Set handles in red slots (widest pair).
- Keep body in a straight plank from crown to heels, hands shoulder-width apart.
- Lower chest to floor—maintaining elbows at ~45°.
- Press through palms, extending elbows fully while squeezing pecs.
- Tricep Diamond Push-Up (Blue Slots):
- Move handles to blue (narrowest) slots.
- Place wrists directly beneath sternum, fingers pointing inward.
- Descend slowly—keeping elbows tight to sides.
- Extend elbows to full lockout, emphasizing triceps contraction.
- Decline Shoulder Push-Up (Green Slots):
- Position feet on an elevated surface (bench or box).
- Place handles in green slots.
- Lower chest while maintaining hips aligned with shoulders—forcing anterior delts to drive the movement.
- Pause brief, then press up—engaging delts and upper chest.
- Core-Engaging Back Push-Up (Yellow Slots):
- Place one handle in a yellow slot on each side (offset).
- Perform push-up while retracting and protracting scapulae—keeping shoulder blades together as you descend.
- Focus on mid-back engagement and anti-rotation core tension.
Beyond these, you can mix-and-match: archer push-ups using one handle on red, one on green; one-arm offset push-ups; or explosive clapping variations. The color-coded guidance prevents guesswork—ensuring each session is efficient and muscle-specific.
Setup Tips and Space Considerations
Implement the Push Up Board Home Gym seamlessly with these tips:
- Find a Flat, Stable Surface: Tiles, laminate, or a thin exercise mat suffice. Avoid high-pile carpets that distort handle angles.
- Clear Adjacent Obstacles: Ensure at least 3 feet of clearance to each side to allow full arm extension and body movement. A 6×6 foot open space area is ideal for full range-of-motion work, including plyometrics.
- Use a Thin Exercise Mat (Optional): A ¼″ Pilates mat under the board adds cushioning for elbows if you descend fully to floor level.
- Mind Wrist Alignment: If you experience wrist discomfort, experiment with slight handle rotations or wear lightweight wrist wraps to maintain neutral wrist angles.
- Rotate Handle Positions Sequentially: For a structured session, perform a tri-set: chest focus (red), tricep focus (blue), and back/core focus (yellow)—moving handles quickly between sets to avoid downtime.
When not in use, slide both handles into the board’s recessed side slots—keeping them hidden and preventing dust accumulation.
Conclusion
The Push Up Board Home Gym reforms traditional bodyweight routines by employing color-coded, ergonomic handle positions to target specific muscles—chest, triceps, shoulders, and back—while maintaining precise form. Its durable ABS construction, non-slip base, and portable design make it a perfect fitness companion for small apartments, home gyms, and travel. By integrating guided push-up variations into your workout, you build balanced upper-body strength, enhance joint stability, and break through training plateaus. Whether you’re a beginner seeking correct push-up form or a seasoned athlete craving advanced variations, this compact board delivers results—turning any flat surface into a muscle-sculpting powerhouse.
FAQ
- What surface is best for using the Push Up Board?
A flat, non-carpeted floor—such as hardwood, laminate, tile, or a thin exercise mat (¼″) provides stability and preserves handle positions. - How much weight can each handle support?
Each handle is rated for up to 440 lbs total bodyweight, accommodating most users for dynamic and static variations. - Can I perform push-up variations for core and back using this board?
Yes—yellow slots emphasize scapular retraction and core tension. Combine green and yellow positions for mixed-core focus routines. - Are the handles comfortable for people with wrist issues?
Handles elevate your palms approximately 2″ off the floor, reducing wrist extension. If you still experience discomfort, try rotating the handle slightly or using wrist wraps for added support. - How do I switch between color-coded positions?
Simply lift each handle vertically out of its slots and insert into the desired color-coded holes. The friction-fit design locks them firmly—no tools required. - Is assembly required?
No. The board and two handles arrive preassembled—just remove packaging and start using. Handles disassemble for compact storage if needed. - Can I use the board outdoors?
Yes. The ABS plastic resists moisture and UV exposure. Wipe dry after use on grass or concrete. Avoid leaving it in direct sunlight for prolonged periods to prevent color fading. - How should I clean the board and handles?
Wipe both with a damp microfiber cloth and mild soap weekly to remove sweat, chalk, and dust. Dry thoroughly before storing to prevent mold or odor. - Is this suitable for beginners?
Absolutely. The board’s guided hand positioning ensures correct form, reducing injury risk. Start with red and blue slots for controlled, low-rep sets and progress to advanced positions. - What ages and fitness levels does the board serve?
From teenagers mastering their first push-ups to veteran athletes seeking progressive overload, the board’s weight rating and handle variety cater to all. Adjust repetitions and tempo rather than handle slots if weight management is needed.